Hey Instagram users, Are you excited to get Blue Tick on your Instagram account? If yes, then you are at the right destination. Because in this Article we will discuss How to Apply for a Meta Verified Blue tick on Instagram. So if you are ready then let’s get started.

What is Meta Verified Blue Tick on Instagram?
The Meta Verified Blue Tick on Instagram shows that an account is real and belongs to a famous person, celebrity, brand, or important public figure. But if we are going to discuss Meta’s new Announcement then there you will find that Now everyone can access this Meta verification Badge which is Meta Verified Blue Tick.
Yes, you heard absolutely right what used to happen earlier that Meta Verified Blue tick was available only to those people who are celebrities, and sports persons whom people know, but now Meta has made a new announcement, in which now Meta Verified Blue tick is given to everyone. Similar to Twitter, they are implementing a paid subscription model for a verified badge. This subscription includes additional features like improved account security, direct support, and more.
In India, users can purchase Meta Verified for a monthly fee of ₹699 on both iOS and Android apps, which covers verification for both Facebook and Instagram. Additionally, Meta plans to introduce a web-only subscription plan in the near future, priced at ₹599 per month.
What is the verification process?
To get a Meta Verified subscription on Instagram or Facebook, you’ll need to provide a government-issued ID and, if available, a selfie video. The ID should match the name and photo on your Instagram or Facebook profile. Once your profile is verified, you won’t be able to change your username or date of birth without going through the Meta Verified subscription and verification application process again. You can find more information about the verification process on Instagram and Facebook.
You may Like it: How To Stop Bad Reels On Instagram
Meta Verified Blue Tick Criteria
To be eligible for Meta Verified, please note the following requirements:
- You must be an actual individual, not a company or brand.
- You need to be 18 years or older.
- You should reside in the United States, Canada, United Kingdom, Australia, New Zealand, or India.
- It is important not to violate the Terms of Use or Community Guidelines on Instagram, or the Terms of Service or Community Standards on Facebook.
- Your profile must use your full real name, which must match the name on your government-issued identification.
- Your profile photo should clearly display your face, which must match the photo on your government-issued ID.
- Two-factor authentication must be enabled for your account.
- Having a previous posting history is necessary. Brand-new accounts are not eligible.
How to Apply for Meta Verified Blue tick on Instagram
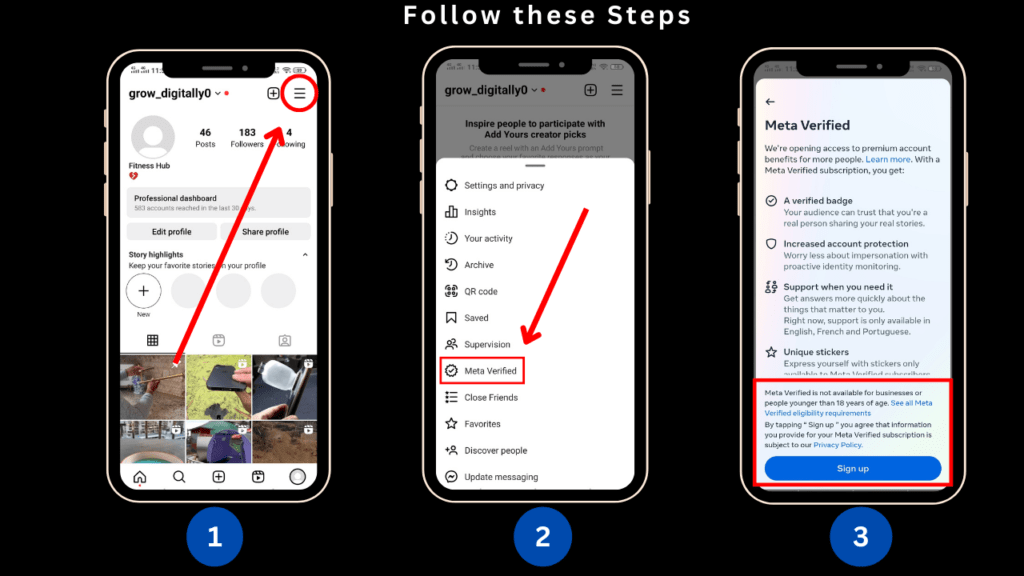
It is very easy to apply Meta Verification Badge Blue Tick, for that you have to follow these steps:
- Open Instagram App
- Go to three lines which are presented at the top right corner.
- Find Meta Verified and Click on it.
- Click on Sign Up.
- Read the Terms and Policies.
- Then Click on Pay Now.


After payment, Meta Team will confirm your identity, which would take up to 48 hours. If they are unable to confirm your identity, then they will refund your payment.
You will be automatically charged 699.00 every month. You can cancel at least 24 hours before your next payment date by viewing Subscriptions in your Google Play settings.
Key Points about Meta Verification:
Selfie Video Authentication: In certain cases, subscribers may be required to submit a selfie video as part of the authentication process.
Rollout Schedule: The rollout of Meta Verification began on Wednesday and will gradually become available to all eligible users over the next few weeks.
Ineligibility for Businesses: Currently, businesses are not eligible to apply for Meta Verification.
Web Purchasing Waitlist: If you’re interested in purchasing Meta Verification on the web, you can sign up for the waitlist through the Facebook web Account Center. This will keep you informed about when web purchasing becomes available.
Tips for Increasing Your Chances of Approval
To Increase the chance of approval, You have to follow these points.
- Build a strong online presence by consistently posting high-quality content that aligns with your niche.
- Engage with your audience, respond to comments, and foster meaningful connections.
- Collaborate with other verified accounts or influential individuals.
- Establish a professional website or blog that reinforces your expertise.
What to Expect After Applying?
Once you’ve submitted your verification application, Instagram will review it. If they approve, you’ll get a notification confirming your Meta Verified status. If not approved, you can reapply after about 30 days. It’s important to keep engaging with your audience and maintaining an authentic presence while waiting.
FAQ’s
The Meta Verified blue tick is a symbol of verification that signifies the authenticity and legitimacy of an Instagram account.
Instagram sets specific eligibility criteria, including having a significant presence in the public interest domain and adhering to its terms of service and community guidelines.
Make sure to have a clear profile photo, a descriptive bio, and public visibility settings that accurately represent your identity or the entity you are applying on behalf of.
Typically, a government-issued identification document, such as a passport or driver’s license, is required for verification. The document should be valid and match the name and photo displayed on your Instagram profile.